Friday, 29 April 2011

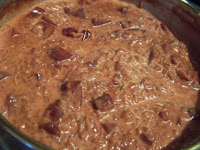
Beetroot risotto with cream cheese and pine nuts

Today, I'd like to share with you a delicious, delumptious, recent discovery. A couple of weeks ago, I came across a little paperback book going for half price in my local supermarket. It's a Hamlyn book by Louise Pickford, called 200 veggie feasts. I was attracted to it because our current straitened circumstances mean that we have to cut back on meat, which tends to be rather costly. Let me tell you, I could happily work my way through the entire book! We have already sampled several of them, and today's recipe is based on one such. It is one of the tastiest meals I've had in a long time.

Ingredients
1200ml stock (I made this up using my old standby Vecon)
4 cooked beetroot, peeled and diced
60ml cooking oil (okay, the book calls for extra virgin olive oil, but in the light of yesterday's post...)
1 red onion, finely chopped
2 garlic cloves, crushed
10ml fresh thyme (or 5ml dried)
300g arborio/risotto/paella rice (you could try ordinary rice, if you like)
125ml red wine
150g cream cheese (the original recipe calls for either mascarpone or soft goat's cheese, but cream cheese works a treat!)
Small bag pine nuts (you could substitute pecans if you prefer - just chop them)
Salt and black pepper to taste

Method
  • Bring the stock to a gentle simmer in a saucepan
  • Heat the oil in a separate saucepan and stirfry the onion, garlic and thyme over a low heat, until the onion is softened and translucent. Add salt and pepper to taste (I added a twist or six of black pepper, but no salt).
  • Add the rice to the onion mixture and stir until every grain is coated and shiny looking.
  • Until the liquid is absorbed
  • Stir in the wine and bring to the boil. Keep stirring until the wine is absorbed.
  • Stir in the beetroot.
  • Add the stock, a little at a time, stirring after each addition.
  • Cook over a medium heat until the liquid is absorbed. You will need to keep stirring, or it will stick. This should take about 20 minutes. Ideally, the rice should be slightly al dente.
  • Remove from the heat and stir in the cheese. Cover and leave to stand for a couple of minutes.
  • Sprinkle each portion with pine nuts as you serve (don't forget this bit, it makes such a difference!)

Thursday, 28 April 2011

On food snobbery

I just wanted to carve out a moment to address this subject before resuming normal service. You will (hopefully) have noticed that I major on everyday ingredients on this blog. It is not my goal to have you swing by the deli, or some specialist shop to buy a bag of something, which you will use once and then never touch again.

That's one thing. But let me get something else perfectly clear, here. I'm no paragon, okay? I don't produce magnificent dishes from scratch, using only fresh ingredients every day of every week. Obviously I recognise that it is better to do so, and I do try to go that route as much as possible. But, at any given moment, you will find in my fridge jars of 'very lazy' minced ginger, chilli and lemon grass. There may also be a jar of tom yum paste, and Thai red/green/yellow curry paste. All ready-mixed. I have on stand-by in my cupboard a few vacuum packed 'cook in' sauces of the sort where you just add the meat.

...and I am not above slinging a frozen pizza in the oven on one of those days when there simply isn't time to do anything else, but everybody's gotta eat. Fortunately, those days are fairly rare at the moment, but I have done two stints of studying, and the acknowledgements page of my Masters' dissertation includes these words "to our two sons, Björn and Torvald who have patiently eaten far too many ready meals..."

I am not a professional chef, nor am I a nutritionist. While I try to provide a largely healthy diet for my family, I am not a health nut... and I have sons, for goodness' sake. Teenage sons!

I am just like you: I have a life. I have a job to do, hobbies to pursue, kids to raise and ferry from one activity to another, a spouse with whom I would like to spend time, a dog to walk, chores to complete and errands to run. I know that 'real' people can't spend all day preparing a meal. I also know that, on the occasions when I do take all day preparing a meal, it is eaten just as quickly as if I had nuked it in the microwave (oh yes, I have a microwave... and I use it). And the things that I throw together at the last minute are often enjoyed more than those long-winded things, anyway.

So yes, I may have shared a recipe that will enable you to knit your own granola, but there will be no elitism here. In this space (and in the conversations that appear on Facebook), there will be no food snobbery. I seek only to share with you the recipes that I use in the hope that you will find them helpful, interesting and - above all - tasty.

Wednesday, 27 April 2011

Köttbullar med gräddsås (Swedish meatballs and...erm... 'gravy')

Being married to a Swede, it was inevitable that I should have to learn to make these early on. Of course, when we moved to the UK and had access to Ikea, we were able to buy frozen meatballs by the bag. Home made ones are still better, though! When I make them, I make a double batch and freeze half for later use.

They can be fried (my mother-in-law fries hers... in lashings of butter, of course), but I find that takes forever when you are cooking large enough quantities for three viking appetites, so I do mine in the oven. Sacrilege!

Oh, and remember what I said about the traditional Swedish diet not being healthy? You have been warned.

First let's get those meatballs going, then we'll make a start on the sauce (which, by the way, translates as 'cream sauce').

Meatballs
Oven temperature
200C

Ingredients
500g minced beef
500g minced pork
1 egg
200-300ml cream-and-water mixture (or the slightly healthier option of just using milk, as I do)
1 small onion, finely chopped
100ml breadcrumbs (or rusk flour if it's available in your area)
2 cold, boiled potatoes
Butter, margarine or oil for frying/baking (we'll come to that in a bit)
Salt and white pepper to taste
5ml ground allspice (this, dear friends, is the critical ingredient that gives the meatballs their 'Swedish' taste)

Method

I roll them in flour as I go
  • Traditionally, you're supposed to saute the onion in butter until golden, but a healthier option is to sweat them in the microwave (place in glass bowl, cover with pierced clingfilm and nuke 'em for about a minute or so). You decide.
  • Peel and mash the potato.
  • Moisten the bread crumbs (or rusk flour) with a little water.
  • Mix the meats, egg, breadcrumbs, potato, flour and seasonings.
  • Add a little of the cream-and-water/milk at a time, until you get a manageable consistency. You might not have to add all of it, but don't despair, you can use what's left for the gräddsås.
  • Shape it into balls with wet hands (so that the mixture doesn't stick too much). You're looking for something about the size of a golf/squash/table tennis ball.
  • Place on a lightly floured chopping board. I tend to roll each ball in flour as I go. I use a small tupperware container for the purpose.
  • I top each one with a tiny knob of butter
  • Traditionally, you are now supposed to fry them slowly in butter (yes, butter, I kid you not!). But I tend to place them in a baking tray. I spray the tray first with Fry Light, but you could grease it, or cover the bottom with a thin layer of oil. Then, if I'm feeling decadent, I top each one each with a tiny knob of butter. I bake them in the oven for about 20 or so minutes, turning every now and then, to ensure even(ish) cooking. Because you have used pork, it is vital that the meatballs are cooked right through.
While those are in the oven, let's get cracking on the sauce, shall we?

Gräddsås
Ingredients
100ml cream or milk (or half of each)
200ml beef stock
15ml cornflour
Salt and white pepper to taste

Method
  • You're supposed to include the scrapings from the frying pan, but since we don't have any, we will make do without. If, however, you've decided to go the traditional route, make up the sauce in the frying pan, starting by swirling the (boiling) beef stock in the pan to loosen up all those little loose bits that remain in the pan.
  • Bring the beef stock to the boil in a small saucepan.
  • Add a little water to the cornflour and mix into a smooth paste. Add this to the stock and stir until thickened.
  • Remove from the heat and add the cream.
  • Season to taste with salt and pepper.
Serve with boiled baby potatoes and lingonsylt (if you can get it). If you can't get your hands on lingonsylt, cranberry sauce makes a fair substitute.

Tuesday, 26 April 2011

Michèle's chocolate loaf

I'm afraid there's no picture for today's recipe, for the simple reason that I haven't made one myself on this occasion. You see, many of my Facebook friends shared pictures of their melted Easter eggs over the weekend, so I thought I'd share an idea of what you might do with those. I only got one small Easter egg this year, and it didn't melt. And, after all my complaints about my burgeoning butt, I was not about to dash out and buy tons more chocolate in order to produce this recipe, so you're going to have to take my word for it and use your imagination.

You can substitute the chocolate specifications below with whatever melted Easter eggs you have.

It takes quite a while to make, with all the chilling of each stage, but it's not labour intensive... and you can get on with other things while the chilling is going on.

If you have sharp eyes and a good memory, you might have figured out that this recipe came from the same friend who gave me the granola recipe I shared some time back.

Ingredients
175g plain chocolate
100g butter
225ml condensed milk
175g shortbread biscuits, crushed
175g white chocolate
50g glace cherries, quartered
50g raisins (or candied peel)

Method
  • Line a 450g loaf tin with cling film, pushing it well into the corners.
  • Melt half the plain chocolate and a quarter of the butter in a double boiler (or in a jug in the microwave - use about 50-80% power), and add about a quarter of the condensed milk. Mix well.
  • Pour half of this into the tin and top with half the biscuits.
  • Pour the rest of the melted chocolate over.
  • Chill for 45-60 minutes until firmish.
  • Melt half the white chocolate with a quarter of the butter. Add a quarter of the condensed milk and half the fruit. Mix well.
  • Pour into the tin on top of the previous layer.
  • Chill again as before. Repeat this process for another two layers.
  • Chill overnight.
  • Turn out, peel off the cling film and slice.

Monday, 25 April 2011

Cake pops

Cake has a central role in most birthday parties - but many a parent has realised that while the little darlings love to look at the cake, they seldom actually eat it!  What does go down well, though, is portion-sized treats. Cup cakes have filled this spot for some time, but now there's a new kid on the block: the Cake Pop.  From a planning point of view they are great because they can be made ahead and chilled or frozen without fear of them drying out.  They work just as well as a dessert (these in the photo were make for an Easter Sunday lunch), or an addition to afternoon tea.

Have fun!

Ingredients:
A cake (I used sponge cakes – chocolate for some and lemon for the rest)
Butter icing
Melted chocolate (I used coating chocolate)
Styrofoam and lolly sticks

Instructions:
This can be as simple or complicated as you like. Buy a pre-made cake, or make up your own cake, either way, no-one will know the difference.

Crumble the baked cake and add to a bowl of pre-made butter icing. Mix until it’s the consistancy of cookie-dough. Put the mixture into the fridge for 15 minutes to harden slightly.


Scoop up tablespoons of the dough and make ping-pong sized balls. Place the balls on a baking sheet and put into the freezer for 30 minutes (or longer) to harden.


Melt the chocolate while the balls are hardening.

Push a lolly-stick into each ball. Put a little melted chocolate on each stick - it will help anchor it in the ball.


Dip the ball into the melted chocolate.

Allow the excess chocolate to drip off, and cover with sprinkles or other treats before the chocolate gets hard.


Push each lolly stick into a covered piece of styrofoam while the chocolate is drying.  If you do not have something to push the stick into, you can put the ball down onto a plate like a toffee apple.


These portion-size treats can be easily themed for a party. White coating chocolate can be coloured to create psycadelic pops. 


All the cake-decorating techniques can be applied to make faces, figures and fun. You can also put the individual pop into a see-through bag as a take-home treat.  If there are any left-overs, they can be frozen.


Thursday, 21 April 2011

Pickled fish

In the UK, it is common to eat salmon on Good Friday. In many South African communities, particularly on the Cape Flats, where there is a strong Cape Malay influence, it is more common to eat pickled fish.

These days I can buy almost everything that formed a part of my shopping list in South Africa at at least one of my local supermarkets, but pickled fish is an exception (there is one other, and perhaps I will find and share a recipe at some point).

I was bemoaning this fact to a fellow ex-pat a couple of years back, and she happily shared her recipe with me, advising me to get myself a copy of the Cape Malay cookbook. To my embarrassment, I realised that not only did I have this cookbook, I used it fairly often. It had just never occurred to me to make my own pickled fish... or even to look for a recipe! I used to buy canned pickled fish in South Africa. It was one of those things you don't think of making (like baked beans and tuna).

So, if you'd like to try a slightly different fish tomorrow, how about this? It's almost certainly going to be cheaper than salmon!

I'm sharing the recipe today, because it needs 24 hours marinading time.

Ingredients
1kg (ish) of firm fleshed white fish
2 pinches salt
10ml red masala (or medium curry powder if you can't get masala)
175ml sunflower oil
1 cardamom pod, split open
375ml malt (brown) vinegar
10ml turmeric (borrie)
5ml chilli powder
15ml sugar
2 onions, thinly sliced
250ml water
2 bay leaves
2 curry leaves (if you can't get these, add more bay leaves)
4 allspice
1 whole clove

Method
  • Blot the fish with paper towel and then sprinkle with one pinch of salt and about half of the masala. Leave to stand for a couple of minutes.
  • Heat oil and cardamom pod in a frying pan and shallow fry fish until light brown.
  • Remove fish from pan and spread in a large, shallow dish (not aluminium). Set aside for now.
  • In a saucepan, place vinegar, turmeric, sugar, second pinch of salt, the rest of the masala, chilli powder, onion rings and water. Bring to the boil and simmer for a couple of minutes.
  • Add the bay leaves, curry leaves, allspice and clove and remove from the heat.
  • Allow to cool slightly, then pour over the fish, covering the fish completely.
  • Cover and set aside for 24 hours for the flavours to develop.
  • Serve with buttered bread and a green salad.

Wednesday, 20 April 2011

Ann's apple (or other tart fruit) crumble

This recipe came from my sister in law. She regularly whips up this dessert if she has fruit to hand. Because she carries the recipe in her head, it's one she can make on family holidays in remote locations.

In 2001, when there was a gathering of the clans on the small Swedish island where my mother-in-law grew up, our summer cottages boasted the bare minimum of culinary equipment, but Ann was able to produce delicious fruit crumbles without turning a hair.

Mine never turn out quite as well as hers, but they're still delicious.

I'll give you the apple recipe first, and then explain what to do if you're using other fruits. The recipe is a little vague - recipes from good cooks often are (they know what they need to do, so it doesn't occur to the that you don't) - but that leaves you room to experiment!

Oven temperature
180C

Ingredients
1 apple per person and one for the dish, peeled, cored, and thinly sliced
Water or fruit juice - there's no quantity given, but all will become clear
A little cornflour (probably about 10ml or so, more if you're making a large quantity)
Sugar to taste
Spice of choice - in the UK, you'd probably think cinnamon, but in Sweden, they'd be more likely to reach for cardamom. I recommend the latter! It is deee-licious. If you're not accustomed to working with cardamom, in this instance you will need to open the pods and crush or grind the black seeds.
50g sugar
50g flour
100g butter/marg (by now, you know I only use butter), slightly softened but not melted

Method
  • Layer the apple slices in your dish. Sprinkle sugar and spice over each layer. The dish should be about 3/4 full of fruit.
  • Mix the cornflour with a little liquid and pour over the fruit. Add more liquid until the liquid level is about a third of the way up the fruit.
  • Now mix together the sugar, flour and butter to form a dryish dough. You can double the quantities of these ingredients if you're catering for a larger group.
  • Using the largest side of your grater, 'grate' the dough to form worm shapes and spread these over the top of the fruit. If the dough is too soft, pop it in the fridge for a while.
  • Bake until the fruit is soft (test with a sharp knife - always test in the middle, because this will take the longest to cook) and the crumble is golden and crisp.
  • Serve with cream, ice cream or custard (or, if your family is anything like mine: all three!)
If you're using pears, the recipe is exactly the same. If you're using berries, you'll need less liquid and a heavier hand with the sugar.

Tuesday, 19 April 2011

Fish cakes

I hope you don't mind: you're going to get fish recipes twice this week. Ironic, considering my early disclaimer regarding a lack of fish in my repertoire. I guess I need to re-evaluate that perception of myself. It appears to be past its sell-by date.

When I was a child, my Mom used occasionally used to buy frozen fish fingers, which I loved (and still enjoy - no food snobbery, here!) and frozen fish cakes, which I loathed. They left me with such a negative impression of fish cakes, that I was well into adulthood with a family of my own before I even thought of trying to make them.

This is a great way to use up leftover fish and potatoes. I made these ones using the leftovers from the stuffed hake recipe I shared a while back, having monstrously over-catered on that occasion - forgetting that there would be just two of us at dinner.

Ingredients
200-400g cooked fish - you can use white fish, salmon, haddock, mackerel... you name it! You could even use shellfish, but you'd need to mince it.
1 large cooked potato
10ml chopped dill (I have explained about my Swedish husband and their addiction to this herb - feel free to use one you prefer, like chives or parsley)
2 eggs
10ml grated lemon zest
60ml flour
Fresh breadcrumbs
Salt and freshly ground black pepper to taste

Method
  • Mash the potato well.
  • Mash the fish and stir it to the potato.
  • Stir in the flour.
  • Beat one of the eggs and mix that in.
  • Add the zest, herbs, salt and pepper, and mix everything together well. If the mixture is too runny, add another mashed potato.
  • Lightly beat the other egg and place it into a flattish bowl.
  • Shape the fish mixture into balls with your hands. Flatten each ball into a patty shape and then dip in the egg, turning the fish cake over to coat each side. It's probably best to use and egg lifter/fish slice (whatever you call it in your neck of the woods) for this task.
  • Dip in the breadcrumbs, and turn, coating both sides.
  • Shallow fry in oil/Fry Light over a medium-high heat until browned on both sides.
  • Serve with salad.

Monday, 18 April 2011

Themed children's parties: clowns

For the second in my series of themed children's parties, I thought I'd look at clowns, simply because that was the theme of my elder son's second birthday party. Poor lamb, his baby brother was three weeks old when he turned two. I was determined that he would have a party in which he could be the centre of attention, and just about did myself in making all manner of clown eats while keeping on top of my normal tasks, and looking after a newborn infant. As you can see, I decided to have only 8 children at the party, so that it would be manageable.

To emphasise the theme, I bought paper plates with clown faces on them. I also made a clown cake, and a few other clown-type eats. I didn't hire an actual clown, because we were way too broke for that, but you could go that route... unless your child is scared of them (and many children are). You might also like to get the kids to dress up as clowns, and decorate the venue like a big top. You can expand the theme to the limits of your budget and/or imagination, whichever runs out first.

First, the cake:

First, the cake...
Please excuse the quality of the picture. It's a scan of what wasn't a great photo in the first place. As you can perhaps see, you will need:

Two round cakes of similar size (you could buy these - I'm not a purist!).
Several different coloured batches of butter or fondant icing. I used butter icing simply because I could make it easily - these days you can buy ready-made fondant icing in just about every colour of the rainbow.
A bag of liquorice allsorts or similar.
A large bow or something you can use to make one. As you can see, I used wrapping paper, which I folded concertina style, and then secured in the centre with some tape.
A silver board. As you can see, I used a tray covered in tin foil.

Method
  • Cut one cake in half.
  • The round cake will serve as the face, and one of the halves as the body. Position the face roughly in the centre of the silver board, and place the 'body' next to that, so that the two curved edges are touching.
  • Out of the remaining half cake, cut a triangular shape for the hat, and several semicircles to serve as curls.
  • Position the hat at a jaunty angle, and place the curls around the remaining edges of the head.
  • Cover with coloured icing as appropriate for each section.
  • Decorate with sweeties to create a face and other details.
  • Place the bow at the point where the head and body meet. You could secure it with a twisty tie.
Clown faces (1)
For the first clown face, you will need:

Round biscuits (cookies), something very flat and plain (arrow root biscuits, Marie biscuits, rich tea biscuits... something along those lines.
Coloured butter icing (you can use leftovers from the cake)
Sweeties such as mini liquorice allsorts, dolly mixtures, Smarties or Jelly Tots

Method
  • Cover one side of each biscuit with icing.
  • Press sweeties into the icing to make a clown face.
Clown faces (2)
For the second clown face, you will need:

Round biscuits (as before)
Ice cream cones (cornets) - the wafer kind, for preference
Coloured butter icing (as before)
Sweeties as before
Marshmallows (optional)

Method
  • Cover one side of each biscuit with icing sugar as before.
  • Press a cone - flat side down - into the icing on each biscuit. If you like, you could pop a marshmallow (or other sweetie) under each cone.
  • Using icing sugar to secure them, press sweeties into the round part of each cone to make a clown face.
  • Once again, using icing sugar to secure them, use sweeties to decorate the triangular part of each cone to look like the clown's hat.

Friday, 15 April 2011

Granny Norton's savoury scones

You're very fortunate, you know? Two of my Gran's recipes in the space of one week!

I had to chortle as I started on this recipe. I have copied it into my book exactly as it was in my Gran's own book. It's just a list of ingredients, a temperature and a time. The sign of a confident cook - she knew what she had to do with the ingredients and how to get the mixture oven ready. She didn't need to write that part down. Fortunately, I saw her make these enough times that I can remember how she did it, and fill in the blanks.

Oven temperature
My Gran had 500F, which is 260C! My oven doesn't even go that high, so I had to settle for 220C. I suggest you do the same - ovens are more efficiently sealed these days.

Ingredients
200g plain flour (my Gran had 150g, but the consistency wasn't right for me, so I added a bit)
250ml grated mature cheddar, pressed down well to get a properly full cup
15ml baking powder
2.5ml cayenne pepper or mustard powder
10ml fresh, chopped chives
2 rashers crispy bacon, very finely chopped (this is optional - if you're leaving the bacon out, you might like to add a pinch of salt, though)
80ml each water, milk and vegetable oil
1 egg (my Gran lists this as optional - I always include it)

Method
    Place on a cooling rack..
  • Sift the flour, baking powder, cayenne pepper/mustard (and salt, if you're using it) together.
  • Add the cheese, chopped chives, chopped bacon and roughly stir together.
  • In a separate bowl, mix the egg together and the three liquids (water, oil and milk).
  • Gradually mix the liquid into the dry ingredients. It will come up much less dry than a normal scone dough (if you're used to making scones, you'll see what I mean, if not, don't worry about it), but it should be stiff enough for you to be able to...
  • Splotch spoonfuls of the mixture onto a greased baking tray (the splotches should hold their shape and not run into each other - if the mixture is too runny, add a little more flour).
  • Bake for 7-10 minutes.
  • Place on a cooling rack (out of the reach of the dog and any passing teenagers/spouses!)
  • Serve, buttered, with a cup of tea.

Thursday, 14 April 2011

Pyttipanna

Pyttipanna translates roughly as 'little bits in the pan'. This dish is the Swedish (and Norwegian) equivalent of hash or bubble and squeak in that it's a way to use up leftovers. But, like both those comparitive examples, it has become such a favourite that it is of often made up from scratch with purpose-bought ingredients.

One thing I have come to realise about traditional Swedish cuisine (and I hope I'm not going to offend anyone here) is that it's not terribly healthy. There's a huge emphasis on animal protein and potatoes, an awful lot of frying in butter, and not a lot of green stuff to be had. It is not unusual to be served a mountain of prawns or langoustines and nothing else at all. Not that I'm complaining, mind - Rökeriet on Sydkoster that does the most delicious smoked prawns I have ever eaten, and I have very fond memories of late summer evenings spent there with various cousins and so forth. But it is small wonder that heart disease is so prevalent, and on the increase, in Sweden.

So I'm not going to suggest that you adopt a steady diet of pyttipanna, but every now and again, it's great comfort food, and it's a lot healthier if you make it yourself than if you buy the ready frozen kind brimming with salt and additives. I am going to suggest that you buck the trend and add a few green things to yours, which is as my husband remembers it from childhood, but not what you would find in the frozen kind or what you would be served in a cafe.

Ingredients
1 potato per person, cut into cubes of about 1cm
1 or more (to taste) onions, chopped
Bits and bobs of meat:
 - A couple of rashers of bacon, chopped
 - Ground beef
 - Chicken, cubed
 - Whatever other leftover meat you have to hand, cubed
Bits and bobs of leftover vegetables, chopped
Eggs - one per person (optional)

Method
The potatoes and onions need a head start
All the ingredients (except the eggs) are fried up in a pan. I use a little oil or Fry Light. If the meat is already cooked, you will need to cook the potatoes and onions first, and the potatoes will take by far the longest. If the meat is raw, you will still need to give the potatoes a bit of a head start, and then add everything else. Keep stirring and turning the food for even cooking.

Traditionally, you should also fry up an egg for each person, and place that on top of the pyttipanna as you serve it.

Whatever you do, don't tell the Swedes I said so, but pyttipanna tastes fabulous with a dash of Worcestershire sauce!

Wednesday, 13 April 2011

Granny Norton's ice cream

My Granny Norton was a wonderful woman who deserved more in life than she got. I loved her so much that school holidays spent with my grandparents were a highlight of my childhood, in spite of the fact that my grandfather was a tyrant and a bully.

Lunch was the main meal of the day and always included dessert. My gran and I used to play a little game during the main course. I would ask her what was for dessert and she would give one of two answers: 'wait and see' or 'hope it's set'. With all the wit at the disposal of a small child, I made acronyms out of those two phrases and began to ask her, "Is it 'was' or 'his' for dessert today, Gran?" to which she would respond with a fond look and a "ho ho ho" that I can't even begin to describe here, but that meant "grown-ups don't really find that funny, but I know you would like me to, and I don't want to hurt your feelings".

My Gran's desserts weren't very adventurous, it has to be said. I have since come to realise that this might have had something to do with my grandfather's rather conservative preferences. Sometimes the dessert was just a can of peaches with evaporated milk (still a favourite with my own family). Sometimes it was a tub of shop-bought ice cream served with a jar of ginger-in-syrup (I still remember those Chinese-style jars).

But sometimes, oh glorious sometimes, it was home made ice cream.

My gran used to make it using a metal ice tray (do you remember those?) with the divider bit removed. If that aluminium tray appeared at dessert time, I was transported with delight. It didn't happen often because it was quite expensive to make in large quantities, and it was very rich, which my grandfather would complain about. I could never understand why we were expected to declare everything delicious and marvelous and wonderful, while he was allowed to find fault... but I am not going to let my grandfather ruin this post as he did so many of my childhood meals, so let's move swiftly on, shall we? This is how you make Granny Norton's ice cream...

Ingredients
410g tin evaporated milk
397g tin condensed milk
250ml water (or, if you want to be really decadent, cream - I use cream!)
5ml vanilla essence and/or flavouring of your choice (I used rose water this time... just yum!)

Method
  • Refrigerate the evaporated milk overnight or place in the deep freeze for two hours. I don't know why, but this really does make a difference to the texture of the finished ice cream.
  • Beat all the ingredients together.
  • Freeze until crystals begin to form.
  • Remove from freezer and beat well.
  • Freeze again until firm. This will give you roughly a litre of ice cream.
The result is (as you can imagine) very sweet and very rich, so a small serving goes a long way.

Oh, and it melts quite quickly, so don't leave it hanging around.

Tuesday, 12 April 2011

Poached haddock

Even as a small child in the (almost) fish-free zone that was our home, I somehow managed to come into contact with smoked haddock... and it was love at first bite.

This is my preferred way of preparing it, and it so easy as to be laughable. So it's an excellent option if you are a little less-than-confident with fish.

Ingredients
1 smoked haddock fillet per person (they're available in dyed and undyed these days, but they taste the same)
Milk
Cornflour
Butter

Method
  • Place the fillets skin side down in a large frying pan.
  • Cover with milk or a half-and-half mixture of milk and water.
  • Bring the milk to boil over a medium heat and then simmer until you can easily flake the fish with a fork.
  • Meanwhile, use the conflour, butter and additional milk to make a white sauce. This is a must - this fish cries out for white sauce.
This is not a fish to serve with chips (fries). It works better with mashed potato or boiled baby potatoes and vegetables/salad. You can add the milk from the pan to the white sauce if you like, but I tend not to.

That's it. Honest. Couldn't be easier.

Monday, 11 April 2011

Themed children's parties: Teddy bear cake

Over the next few Mondays, I thought I might look at ideas for children's parties. When my children were little, I used to go to great lengths for their birthday parties. Since their birthdays are only 22 days apart, for several years they had a combined party.

And there was always a theme.

Some of the themes over the years were: teddy bears, pirates, nursery rhymes, Kideo (a South African children's TV programme), all the children of the world, faces, chess and sports.

The trick with a themed party is to make sure that the cake fits in with the theme, that suitable decorations are easy to come by, and that you can get eats that work with the theme, too. If you can get the kids to dress up, so much the better, but remember that this might impact on their ability to play boisterous games. I had one kid pitch up at a party dressed as a T-rex. He looked great, but he could barely move. When it came to time for the games, we had to find him something else to wear.

Because I'm sad like that, I used to make sure that the plates/bowls each child got also fitted with the theme. A tip, here: write each child's name on their plate and cup in big letters - use lower case if they're very little kids - so that they can keep track of where they left their plate and there won't be tears and tantrums over the alleged theft of food.

I thought I'd start the series with a teddy bear cake. Simply because that was the first theme I ever used. My elder son's name is Björn (which, incidentally, rhymes more with turn that it does with torn). This is a fairly popular name in Sweden, and it means 'bear'. Not in some abstract way, but literally. A small B björn  is a bear, and an isbjörn  (ice-bear) is a polar bear. So, for his first birthday, while we didn't have a party, I made him a teddy bear cake. That's him you see in the photo above, getting very excited about the "Tetty pear."

You could use this cake for a teddy bears' picnic party. Alternatively, if you're having a hee-uge party, you could make three different sized bear cakes to represent the three bears for a fairy tales party.

You will need:
2 round cakes, one slightly larger than the other (recipe below) for the body and head
6 cupcakes for the ears, 'hands' and feet - you can either bake or buy these
Butter icing (recipe below)
A large silver board/tray to place the cake on - a tray, covered in tin foil works just fine
Liquorice all-sorts or similar to make the face

If you're baking the cupcakes yourself, increase the cake recipe by half to allow enough mixture. They won't need to bake as long as they bigger cakes, so keep an eye on them!

Oven temperature
180C

Ingredients
Cake
225g butter, softened
225g caster sugar
4 eggs
225g plain flour
10ml baking powder
5ml vanilla extract

Icing
375g butter, softened
750g icing sugar
Little milk for mixing
Few drops of colouring

Method
  • Cream the butter and sugar together until thick, light and creamy.
  • Add eggs one at a time, beating after each addition.
  • Sift the flour and baking powder into the mixture and fold in with the vanilla extract.
  • Spoon into two greased baking tins: a one-litre and a 1.5 litre sized tin.
  • Bake for 20-25 minutes until a skewer comes out clean.
  • Turn out onto a cooling rack and leave to cool completely.
  • Cream the butter for the icing well.
  • Sift the icing sugar and add it gradually, beating well after each addition.
  • Add just a little milkk to give it a smooth consistency.
  • Stir in enough colouring to get an even tint in the colour of your choice.
  • Set aside until needed.
  • Position the cakes on the board/tray. You may like to trim the edge of each cake where they touch for a snug fit.
  • Position the cupcakes as appropriate for the ears, hands and feet. You may need to trim edges in order for them to sit snugly.
  • Spread an even coating of icing over the whole cake. If you want to achieve a furry effect, dip a paintbrush in water and make long downward strokes in the icing.
  • Use sweets to form facial features (and toe and finger pads, if you like).
  • Cover the join between head and body with a bow.
Friday, 8 April 2011

Jenni's chicken


This recipe came from my friend in Cape Town, shortly after John and I were married, and has become a fairly regular feature in our household, especially when there's promotion on packs of drumsticks!

Oven temperature
180C

Ingredients
1kg (roughly) chicken portions
250ml mild mayonnaise (such as Kraft)
250ml chutney (Mrs Ball's for preference, but any chutney will do, as long as it isn't too sweet - perhaps you could even try lemon atjar, now that you have the recipe, although I've never tried it with that)
30ml (or so) brown onion soup powder (if you live in a part of the world that doesn't have this on offer, just finely chop a bit of onion, or use dried onion flakes)

Method
  • If you want to shallow fry the chicken portions first to seal them first, you go right ahead. I don't bother.
  • Place the chicken portions in a single layer in a casserole dish.
  • Mix the chutney and mayonnaise and spread over the chicken.
  • Sprinkle the onion soup powder (or whatever) over the top of that.
  • Cover with tin foil and bake for about half an hour.
  • 
    Make sure the chicken is cooked through
    
  • Uncover, turn the portions and bake for another half an hour, uncovered.
  • Make sure the chicken is cooked through before you serve it, you don't want to give you family/guests salmonella.
  • Serve with rice and vegetables. Spoon some of the sauce over the chicken and the rice for extra yumminess.
Note:
When I am making this dish (and several others), I add a teaspoon of cumin seeds to the rice when I start cooking it. I love the interesting dimension it adds.

Thursday, 7 April 2011

Bunch o' grapes starter

I don't know if you know this, but fruit and cheese are a match made in heaven. This is a lovely, fresh starter of a sensible size so as not to spoil your appetite. It's also ideally suited to the warmer weather we're currently enjoying in the UK.

It involves no cooking whatsoever, so you have the whole stove free for the main course. What's not to like?

Ingredients
1 fresh, ripe-but-firm-ish pear for every two people (you can used canned pears if you prefer)
Cream cheese (the lighter versions work just as well)
Seedless grapes (red or white)

Method
    Fat side up
  • Peel and core the pears and cut them in half lengthwise.
  • Place each pear half on a plate, flat side down.
  • Holding the pear in place with a fork, spread it fairly thickly with cream cheese.
  • Slice the grapes lengthwise, and press them into the cheese, until the whole pear is covered.
  • When you serve this starter, Turn the plate so that the pear is fat side up, to give the appearance of a bunch of grapes. To increase the impression, stick a grape stem into the top end of each pear. If you have access to a vine leaf or two to place on each plate, so much the better.

 Note:
Pears are absolutely perfect with blue veined cheeses such as Stilton or Roquefort. You may like to mash up a bit of this into the cream cheese to sharpen up the taste of the starter a bit. Just take care not to overdo it or the grapes won't stick.

Wednesday, 6 April 2011

Stuffed hake (or other white fish)

This recipe appears, unacknowledged, in my own handwriting in my recipe book. I do remember how I came by it, though.

I was accompanying some or other boyfriend (which puts the occasion at least 25 years ago!) on a visit to his extended family, and, on offer was the largest whole fish I had ever seen. Fresh caught that day by the host, apparently. For a reluctant fish eater, this was not a welcome sight! I took a portion, because that's the polite thing to do, but it was with no great eagerness, I can assure you. I was so surprised at how palatable the dish was, that I asked the hostess for the recipe. I didn't record her name with the recipe because I couldn't remember what it was. If I had, I would probably have spent hours wondering who the heck Pamela Watson (or whatever) was!

In South Africa, hake is quite easy to come by. Less so in the UK. On this occasion, I was able to find some, but I will never tell how much I paid for it! Suffice to say that it came from Waitrose ('nuff said). Instead, you can use pretty much any firm-fleshed white fish that comes in a large enough version to meet the requirements of the recipe. I'm sure cod would work, but I have a bit of a thing about eating endangered species and, as far as I know, cod still appears on WWF's list.

Oven temperature
180C

Ingredients
1kg hake or equivalent, either as a single fillet or as two 500g fillets, skin on
25ml onion, finely chopped
7 rashers of bacon, 5 whole and 2 finely chopped
60g butter
10ml fresh parsely, chopped
350ml fresh breadcrumbs
2ml dried mixed herbs
Salt and freshly ground black pepper to taste
2 tomatoes, sliced
150ml white wine

Method
  • If using a single fillet, cut it in two equal halves. Lay one, skin side down in a greased baking dish.
  • Saute the onion and chopped bacon in 30g of the butter.
  • Add the sauteed mixture to the breadcrumbs, parsley, mixed herbs and seasoning.
  • Spoon this mixture over the fillet in the baking dish.
  • Carefully place the other fillet, skin side up, on top of the mixture.
  • Arrange the tomato slices on top and then cover with the 5 whole rashers of bacon.
  • Dot with the remaining 30g of butter and pour the wine over (carefully, so as not to dislodge the butter).
  • Ready for the wine, and then the oven
  • Bake for about 45 minutes, basting regularly.
  • Serve with new potatoes and vegetables or a salad.

Tuesday, 5 April 2011

Lemon atjar


Karyn tasted this delicious chutney at my house some years before they left for England and has asked me to share the recipe. It is delicious with chicken, pork and fish but our family is known to eat it with just about anything - sometimes on a piece of toast.

It is very important to use the right kind of lemons as those thick skinned knobbly ones have a lot of pith and you will land up with something so bitter it is inedible. Smooth skinned lemons or limes do best.

I also prefer using saltanas as against raisins to avoid them looking like squashed flies.

16 - 18 medium sized lemons
500g onions sliced
quarter cup salt
1 litre white vinegar
800g sugar
250ml honey
250g raisins or sultanas
50ml mustard seeds
4 pieces fresh ginger
5ml red pepper
4 bayleaves
fresh mint

I tried leaving the prices on the ingredients which might be quite fun to compare but I'm not sure if they are readable in the photo.

Wash, dry and slice the lemons in thin slices removing as many pips as you can. Layer with onion slices in a stainless steel or plastic basin (not aliminium) sprinkling each layer with salt. I prefer to use that salt that comes in a grinder as against ordinary table salt. Leave to stand for 2 to 3 hours and then rinse and drain.
Then simply just throw all the other ingredients except the mint leaves into a large pot and bring to the boil. Add the lemons and oinions and leave to simmer until the lemons are soft - about half an hour. Pour the hot chutney into sterilized jars and press a mint leaf into each one. Seal while hot. It's best to fill the jars to overflowing so that when you put the lid on you force out any airbubbles. The best and easiest way to sterilize jars is just to wash them in the dishwasher. Alternatively fill them with water and boil them up in the microwave.

This quantity makes about 6 medium jars.

Monday, 4 April 2011

Banoffee pie

The name 'banoffee' might be unfamiliar to you. It was certainly unfamiliar to me when I arrived in the UK. I thought I was in for something exotic the first time I heard of it, and then I realised that I was well acquainted with it, only under a different name. In fact, 'banoffee pie' is a silly name on two counts:
  • First of all, it isn't a pie at all, but a tart.
  • Secondly, banoffee is a contraction of 'banana and toffee', but there is no toffee involved. What there is, is caramel.
So, in fact, you may know this dish (as I did most of my life) as caramel and banana tart, which is a closer description of what you're getting.

Be all that as it may, this is how to make it.

Crust
You have a choice, here.
  1. You could make the crust out of crushed biscuit (cookie) crumbs and butter as in the fruit tart recipe, or...
  2. You could blind-bake a quick shortcrust case as I described in the milk tart recipe.
I usually go with the latter, and omit the sugar, because the filling for this tart is sooooo sweet, it needs a bit of balancing out (or a foil, as it's also known).

Filling ingredients
1 large (or 2 small) banana
1 tin condensed milk (or you could just buy a tin of caramel)
30ml or so of lemon juice
Whipped cream to decorate (optional)

Filling method
  • If you're using condensed milk, place the tin (unopened) in a saucepan and cover with boiling water. Boil for 2 hours, topping up the water level every now and again as required. I tend to lay the can down on its side, so that it can roll around a bit with the movement of the bubbles. If you prefer to stand the can upright, turn it over about half way through the boiling process.
  • Set aside and leave to cool. If you try to open the tin while it's still hot, the caramel will squirt out all over the place (this is pure physics relating to temperature and pressure, but we won't go there, now)
  • Slice your banana quite thinly and toss well in lemon juice. This prevents the banana from going brown, so if you don't care about that, you can leave this step out.
  • Arrange the banana slices all over the (cool) crust.
  • Open the tin of caramel, and empty it out into the bowl with the lemon juice. Mix the two together. This will just take the edge off the sweetness, and ensures you don't waste the lemon juice after treating the banana. However, if you have an unlimited capacity for sweetness, you can leave the juice out. I would still give the caramel a stir, though, to make sure you have a smooth, spreadable consistency.
  • Spoon the caramel over the banana slices and spread evenly.
Just a tip: if you're using a baked crust, don't take the tart out of the baking dish until you have filled it. This will support the crust while you're spreading the caramel and prevent it from breaking. If you're using a biscuit crust, you will be serving the tart in the dish anyway, so this tip doesn't apply.

Serve with coffee or as a dessert.

Friday, 1 April 2011

Swedish beetroot salad

I adore beetroot (beets, to you American types), and I owe it to my husband that I eat them at all. I went through much of my life declaring that I didn't eat beetroot, until one day he said "I'm surprised that you don't at least eat pickled beetroot, since you love every other kind of pickle so much." He had witnessed me work my way through an entire bottle of gherkins on more than one occasion. I tasted a jar of beetroot salad and utterly reversed my stance on the vegetable.

Our younger son was completely addicted to pickled beetroot (or 'dootloot', as he called them) as a baby, and would wolf them down like there was no tomorrow. This resulted in large pink stains on the towelling nappies (diapers) that I insisted on using (being too green to go the disposable nappy route). Too much information? Sorry. Some people have no class!

It would be logical to assume that I learnt how to make this salad from my (Swedish) mother in law, but I have a vague feeling that this was not the case. In fact, I think I remember encountering it at the Swedish stall of a world food fair thing.

Be that as it may, this is how you make it. As usual, I leave it to you to tweak the balance of the ingredients to your taste.

1 boiled beetroot per person, cubed - you can use pickled ones if you like, but I prefer them plain for this salad
Hard cheese, cubed - sharp Cheddar or feta will do
A little onion or chives (about a teaspoonful per person), finely chopped
Gherkins, chopped
Mayonnaise - I prefer the milder/non-tangy kind like Hellmans/Kraft

Mix together and serve, topped with a mashed hard-boiled egg.

As an alternative, you can use equal quantities of potato and beetroot. This is especially good if you are using pickled beetroot.

Oh... and dill is a Swedish staple, so, if you fancy adding a bit of that, it will never go amiss.